CHAPTER 4
EXAM ACTIVITY
An Exam activity allows a student to take a test on line, rather than having to be at a specific location at a specific time. An Exam may consist of true and false, multiple choice, fill-in-the-blank, and/or essay questions. The professor will create the exam and schedule it for students to take during a specified time period. Once the time period has expired the exam is closed and can no longer be taken. The completed exam is kept private, only the professor who scheduled the exam and the student can see the answers.
4.1 Doing an Exam
When a professor schedules an exam, a new comment will appear in your class conference. The text of the comment will include the earliest date and time you can start the exam and the latest date and time you can start the exam. The maximum time allowed for taking the exam is also displayed. You must begin the exam no later than the latest date and time that is displayed. The system will not allow you to take an exam before or after the dates and times listed. For example, if the earliest start time is May 5 at 8:00 am and the latest start time is May 8 at 10:00 p.m. and the time allowed for the exam were 60 minutes, you would have to begin the exam no later than May 8 at 10:00, and your exam would have to be completed in 60 minutes. If you attempt to take an exam outside the time parameters you will be notified that the exam is closed and to either try again later (because you tried to take the exam before it was opened) or to contact your professor (because you tried to take the exam after it had closed).
When you are ready to take an exam select review activitY list in the conference where the exam is stored. All of the activities in the conference will be displayed here. Select Do. EIES® will ask: Enter item number of the activity (#/c#cc# ) >. Type the number of the exam activity you wish to do (the activity number is displayed in the "Comment ID (CC#)" column). You will be presented with the Take Exam Menu. This screen, and all the remaining exam screens utilize a Lynx browser. The Lynx browser functions differently than the normal EIES® system does. Basic instructions always appear in the lower 3-4 rows of the screen (also called form). Please refer to the table below for additional instructions on navigating through the Lynx browser.
| What you want to do in Lynx | What to do/Lynx command |
| Get help while using Lynx | Press the h key (you must be in Lynx at the time) |
| Go to the next page | Press the spacebar |
| Highlight next topic or move to the next field | Press the down arrow key |
| Highlight previous topic or move to the previous field | Press the up arrow key |
| Move to previous page | Press the - key |
| Reload the screen | Press the Ctrl key and the r key simultaneously |
| Quit Lynx and return to EIES® | Press the q key |
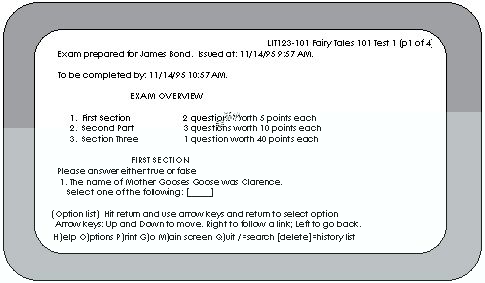
When you begin an exam the Take Exam Menu indicates that your exam has been prepared and will be sent to you when you submit the form. To submit the form simply press <ENTER>. This will ‘click’ the Retrieve exam button. If you do not wish to take the exam now, press q to return to EIES®. Once you click on the Retrieve exam button your exam has started. A message will be displayed in the lower part of the screen stating: "http request sent; waiting for response". Then the exam will be displayed; it may be similar to the exam below:
If you are disconnected from the system while taking an exam try to sign on again. If you are able to reconnect, follow the steps listed above for taking an exam. Your status on the Activities Review screen should be ‘taking’. Your exam will be restored and will include all answers as of your last ‘submit’ (see Chapter 4.2 for information about submit). If you are unable to reconnect record the date and time that you were disconnected as well as any error messages that were displayed on your screen. Send this information to your instructor at once.
4.2 Answering Exam Questions
An exam consists of sections and questions (though an exam may have just one section, and/or just one questions). At the end of every section is a [submit answers] button. This button is the equivalent of handing in your test to your instructor. You MUST press this button (move to the [submit answers] field and press <ENTER>) after you answer the questions. This will record your answers and tell you the time you have remaining to complete the exam. Press the left arrow key to return to the exam. If the left arrow key doesn’t return you to the exam, try pressing the TAB key once and then pressing the left arrow key. If you answer all the questions on the exam and forget to press the [submit answers] button your answers will not be recorded and sent to the professor. To be safe we recommend that you press the [submit answers] button after completing each section. If the sections are long you may want to press the [submit answers] more often. The system will permit you to submit your answers one time after the time for the exam has passed. Your professor will receive the last copy of your exam before time expired and a copy of your exam after time expired. It is up to the discretion of the professor to decide which copy to use.
A full question may be split between two (or more) pages. Press the spacebar to see the next page. Press the up arrow to go back to the previous page (or question). There are four types of questions available, true or false, multiple choice, fill-in-the-blank, and essay. Your exam may have all of these question types, or just one.
To answer a true or false question, move to the "Select one of the following: [_____]" field so that the [_____] is highlighted, then press <ENTER>. A box with the words true and false will pop up on the screen. Use the up and down arrows to select an answer and then press <ENTER>. Your answer will appear in the [_____]. You may change your answer at any time during the exam by returning to the field and selecting a different answer. Remember to press the [submit answers] button to record any changed answers.
To answer a multiple choice question, use the up and down arrows to move to the ( ) in front of the answer you wish to select, then press <ENTER>. A * will appear in the ( ). You can change your answer by moving to a different choice and pressing <ENTER>. The * will move from your previous choice to your new choice.
To answer a fill-in question, use the up and down arrows to move to the long line that appears after the question (you will not be able to move to the shorter line in the question itself). Type your answer. When finished, use the TAB key or the down arrow to move to the next question. You can change your answer by returning to the long line and typing a different answer.
To answer an essay question, use the up and down arrows to move to the series of long lines that appear after the question. Type your answer. When you near the end of a line, use the down arrow key to move to the next line. When finished, use the TAB key or the down arrow to move to the next question. You can change your answer by returning to any line and typing a different answer.
Remember to click on the [Submit answers] button from time to time to record your answers.
When you have finished your exam press the q key to quit. You will be asked: Are you sure you want to quit? [Y]. Type y to quit the exam or n to continue taking the exam.
4.3 Overview of Creating an Exam
There are several steps necessary to create an exam. First, the questions (also called source questions) must be stored in a conference on EIES® in a specific HTML format (see chapter 4.3.1 for format specifications). Since the text of the questions (and answers) will be viewable by any members of the conference, the questions should not be stored in a conference which have students as members. It is recommended that a private conference be set up.
Once your questions are on EIES®, the next step is to create a single MakeExam activity in the conference where your exams are stored. You only need to do this step once, then you can create an unlimited number of exams.
The next step is to actually create an exam. You can create your exams at anytime. An exam is not viewable by students until the time when it is scheduled to be taken. Therefore, you can create all the exams for an entire semester at the beginning of the semester.
Finally, the exam must be scheduled, which will make it available for students to take.
4.3.1 Question Format
The questions for an exam must be stored in a conference on EIES® in a specific HTML format. Any number of questions and question types may be stored in a single EIES® conference comment; however, for simplicity you may wish to store only one type of question, or questions for a single subject in each comment. If your questions are already in electronic form, you may simply change them to the proper HTML format off-line and then upload them to EIES®.
Each question within a comment must begin on a new line. The first characters on the line must be <li>. Next, the text of the question should appear followed by the characters <!--E TYPE. After TYPE the format will vary. The exact format for each type of questions is presented below:
| Question Type | Format |
| True or False | <li>Text of Question.<!--E TYPE=tf ANS=true--> |
| Multiple Choice | <li>Text of Question.<!--E TYPE=pick CHOICES=(list of choices) ANS=answer--> Note: multiple word answers must be encased in double quotes. |
| Fill-in-the-blank | <li>Text of Question.<!--E TYPE=line MAXLENGTH=40 ANS=answer-->Note: multiple word answers must be encased in double quotes. |
| Essay | <li>Text of Question.<!--E TYPE=essay COLS=60 ROWS=5--> |
Here are some sample questions:
True or False
<li>The name of Mother Gooses Goose was Clarence.<!--E TYPE=tf ANS=true-->
<li>Mary had a little lamb whose fleece was black as coal.<!--E TYPE=tf
ANS=false-->
Multiple Choice
<li>What sat down next to little Miss Muffett?<!--E TYPE=pick CHOICES= (tiger spider "Santa Clause") ANS=spider-->
<li>What did Peter Piper pick a peck of?<!--E TYPE=pick CHOICES=("pink pandas" "prickly pears’ "pickled peppers") ANS="pickled peppers"-->
Fill-in-the-blank
<li>Old King ________ was a merry old soul.<!--E TYPE=line MAXLENGTH=40 ANS=Cole-->
<li>Little boy blue come blow _______.<!--E TYPE=line MAXLENGTH=40
ANS="your horn"-->
Essay
<li>Why can’t wood chucks chuck wood?<!--E TYPE=essay COLS=60 ROWS=5-->
<li>List and explain what measures engineers can take to prevent London Bridge from falling down.<!--E TYPE=essay COLS=60 ROWS=5-->
4.4 Creating an Exam
4.4.1 The MakeExam Activity
Once the exam questions are stored on EIES® and you are ready to create an exam you need to set up a MakeExam activity (you only need to do this one time). Once the MakeExam activity is created you can create an unlimited number of exams. To set up the MakeExam activity, enter the conference where you would like to store your exams (you will probably wish to use the conference where the questions are stored) and select review activitY list. From the Activities Review screen select Create activity. EIES will ask: Enter item number to associate this activity with (#/c#cc#) (<CR> for new item) >. Press <ENTER> for a new item. You will then be at the Exam Create screen. Select Exam and press <ENTER>. EIES® will ask for a subject. Type a subject for this item (for example "Exams Are Here"). Your MakeExam activity will now be created and you will be taken to the Exam Preparation Menu.
Once you have created a MakeExam activity in a particular conference, you should associate all exams with that item. In other words, you should only have one MakeExam activity per conference. If you are using one conference to store exams and questions for several courses, you may wish to have one MakeExam activity for each course. You do not; however, need a MakeExam activity for each Exam. For example, if a professor is teaching two courses; Fairy Tales 101 and American Literature 390, they may wish to have one MakeExam activity for each course, and then associate all the Fairy Tale exams with one MakeExam activity and all the American Literature exams with the other MakeExam activity.
DO NOT delete the MakeExam activity or the conference comment it is attached to. If you delete either of these items any exams that you have created will be lost. See Chapter 4.6 for instructions on deleting an exam.
4.4.2 Create Exam
If you have already created a MakeExam activity and wish to create an exam, select Do from the Activities Review screen. When EIES® asks: Enter item number of the activity (#/c#cc# ) >, enter the comment id associated with the MakeExam activity. This will take you to the Exam Preparation Menu presented after the following paragraph.
If you are creating your first exam and have just created your first MakeExam activity, you should be at the Exam Preparation Menu which appears below. This is an HTML/Lynx screen. It may take a few seconds for the screen to appear.
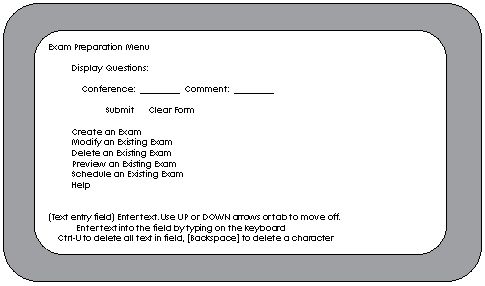
If you wish to view any of the source questions you have stored on EIES® at this time, type the location of the questions in the Conference: and Comment: fields (do not include c in front of the conference number or cc in front of the comment number). Use the TAB key or the UP and DOWN arrow keys on your keyboard to move between each field, and the other menu choices on the screen. Once you have filled in the location of your questions move to the Submit button and press <ENTER>. The Submit button (as well has any other choice) will be highlighted when you have landed on it. If you have made a mistake while typing the location of your comments, move to the Clear Form button and press <ENTER>. When you have successfully entered the location of your questions you will be presented with a listing of all of the questions contained in the EIES® item you indicated. The Formatted Exam Source Listing Screen appears below:

Once you have viewed the questions, press the LEFT arrow key to return to the Exam Preparation Menu. Next, move to the Create an Exam button and press <ENTER>. You will be taken to the Exam Identification Data Screen. Here you will enter the course number, semester, and title of the exam. You may use any format you wish for the identification data; however, you may wish to use the format used at your academic institution. Once you have entered all of the information, move to the Submit Form button and press <ENTER>. If you have made any errors you can erase the data with the Clear Form button (this will erase all of the information from the screen).
After completing the Exam Identification Data form, you will be taken to the Add Section/Question Screen. This is where the actual questions are added to the exam. The screen is displayed below:
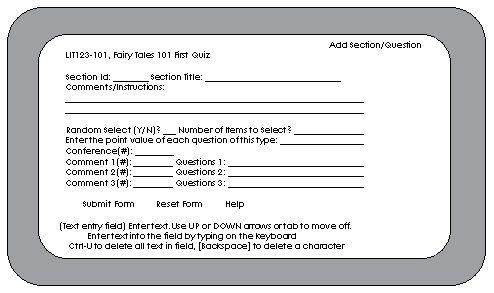
The Section ID refers to the part number of the exam. This is an internal system identifier which will not appear on the exam itself. You may have as few or as many exam sections (parts) as you wish, and they may be in any format; however, each section id must be unique.
The Section Title is the name of this section (part) of the exam. If you wish to have a section or part number appear on the exam, include it as part of the Section Title. For example, you may wish to call a part of your exam "Part 1 - Famous Marys" which may include questions about the many Marys that appear in fairy tales. Another part could be called "Section B - True and False" which could contain only true and false type questions.
The Comments/Instructions field allows you to add directions for each section of the exam. For example, you may wish to have your students answer two out of three essay questions in a particular section.
By typing Y in the Random Select(Y/N)? field the system will select a subset of questions from a larger list of questions. For example, if you have 20 essay questions about the Brothers Grimm, you can have the system randomly select three of the 20 questions for each students’ exam (each student would get a unique set of questions to answer). If you do not wish to use the random select feature you must type N in the Random Select(Y/N)? field, you may not leave this field blank. Enter the number of questions you would like have randomly selected in the Number of Items to Select? field.
You may assign a point value to each question in the Enter the point value of each question of this type: field. There is no limit to the total number of points on an exam.
The next few fields are used to indicate which questions are to be used on the exam. Enter the number of the conference where the questions are stored in the Conference(#): field (be sure to list only the conference number, do not precede it with a c). Next, in the Comment 1(#): field, type the comment number of the first comment where you want to pick questions from (again, be sure to list only the comment number, do not precede it with a cc). Now enter the questions that you would like to include on the exam. Indicate a range of questions with a - (i.e., to include questions 5 through 9 type 5-9). Separate a list of questions with a comma (i.e., to include questions 2 and 4 and 6 and 8 type 2,4,6,8). You may mix ranges and individual questions by combining the two methods (i.e., to include questions 4-6 and questions 8 and 14 and 21 type 4-6,8,14,21).
If you wish to enter more questions from this conference enter the location of the questions in the fields provided for comment 2 and 3 and questions 2 and 3.
Finally, move to the Submit Form button and press <ENTER> to add this section to the exam. EIES® will notify you that the section has been added to the exam. Any error messages will be displayed in the lower portion of the screen, just below the Submit Form/Reset Form/Help menu bar. The table below lists the possible errors you may encounter when adding sections/questions to an exam.
| Error Message/Problem Encountered | Solution |
| System is not responding. | Be sure you pressed the Submit Form (or equivalent) button. |
| "Maximum length reached"/ can’t type anymore characters. | You have exceeded the number of characters allowed in the field, use a shorter name. |
| "Id invalid or not unique". | The section number or name has already been used in the current exam OR there is an invalid character in the section number. Select a new section name or number. |
| "Random group indicator invalid". | You didn’t type a Y or N in the "Random Select (Y/N)? ___" field. |
| "Number to Select invalid". | In the "Number of Items to Select? ___" field no number was indicated OR the number of questions indicated exceeded the number of questions provided in the ‘Questions" field. |
| "Comment # question # invalid type". | No source questions were found at the specified location OR the format of the question was incorrect. Go to the conference and confirm the location and question format. |
| "Conference invalid". | The conference was not found. Be sure to type only the conference number (do not precede the conference number with a C. |
If you wish to add another section, press the Left arrow key once. This will return you to the Add Section/Question form. The information from the section you just added will be displayed. Press the Reset Form button to erase the previous data from the screen and enter the information for the new section.
You may stop adding sections/questions at any time, and complete the exam at a later date using the modify exam function described in Chapter 8.x.
If you have added all the questions to your exam and are ready to schedule the exam, please see Chapter 4.8, Scheduling an Exam.
4.5 Modifying an Exam
If you wish to change an existing exam, or finish creating one, go to the conference where the MakeExam activity is stored and select review activitY list. Then select Do and enter the comment id associated with the MakeExam activity. You will be taken to the Exam Preparation Menu. Press the Modify an Existing Exam button. The Exam Selection List screen will be presented. A header for each exam associated with the Make Exam activity you selected will appear on this screen. The exams are listed in the order they were created (the most recent exam is listed last). If the exam you wish to modify does not appear here, be sure that you entered the correct Make Exam activity (we strongly suggest that only one Make Exam activity be used in a conference). Press the button for the exam you wish to modify. The Modify Exam screen will be displayed as below:
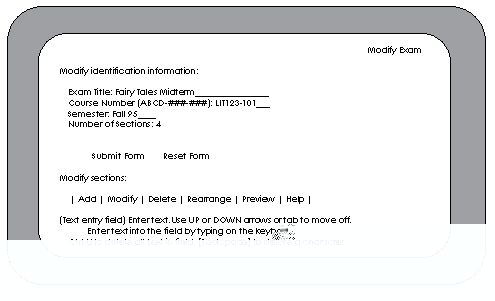
The Modify Exam screen displays the exam title, course number, semester, and number of sections on the exam. A menu appears in the lower third of the screen. You may choose to Add a new section to the exam, Modify an existing section to the exam, Delete a section of the exam, Rearrange the order in which questions appear, or Preview an overview of the exam.
4.5.1 Previewing an Exam
Before you modify an exam, you may wish to see what type of questions it contains. Pressing the Preview button will display an overview of the exam similar to what appears below. Each section (section id and section title) of the exam is listed. If you wish to see the actual questions that appear on the exam, press the button of the section you want to view. When you have finished previewing the exam press the left arrow key to return to the Modify Exam screen.
4.5.2 Adding a New Section to an Existing Exam
If you wish to add an entirely new section to an existing exam, select the Add button from the Modify Exam screen. An Add/Section/Question form will appear. This form is identical to the one you fill in when creating a new exam. Fill in the Add Section/Question form, indicating the new section id (which must be unique), section title, list of questions, etc. When you have entered all of the information press the Submit Form button. If you wish to add any additional sections to this exam simply press the Reset Form button and enter the information for the new section. If you encounter any errors refer to Table 8.A for solutions.
4.5.3 Modifying an Existing Section
If you wish to add or delete a question to an existing section of an exam, change the point value of questions, or change the section id, title, or instructions, press the Modify button on the Modify Exam screen. Then select the section of the exam you wish to modify. You will be presented with a Modify Section screen which will contain the current information for the section. An example of the Modify Section screen appears below.
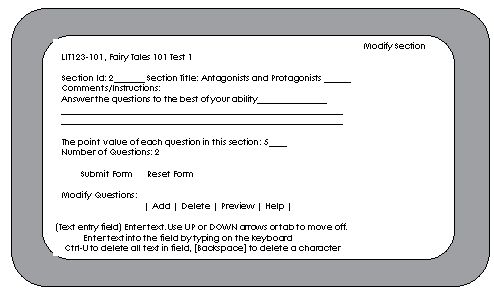
To change the section id, section title, comments/instructions, or question point value simply move to the appropriate field and retype the information, then press the Submit Form button. You will be notified that the section has been modified. Use the left arrow key to return to the Modify Section screen.
If you wish to add some additional questions to the section press the Add button. You will be taken to the Add Questions form. Enter the location of the additional question(s) and press the Submit Form button. You will be notified that the questions have been added to the exam.
To delete a question from the section press the Delete button. You will be presented with the Delete Questions form as shown below.
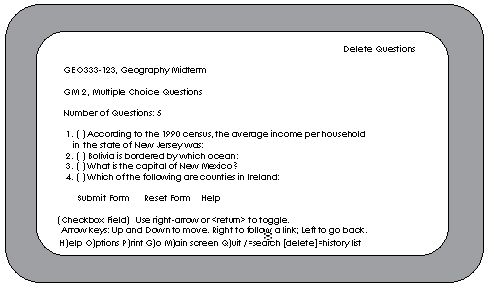
Use the TAB key to move to the question you wish to delete from the exam, and then press <ENTER>. The ‘box’ to the left of your question will now be ‘checked’ (to ‘uncheck’ a question, move to the box using the TAB key and press <ENTER> again). Check off all of the question(s) you want to remove from the exam and then press the Submit Form button. You will be notified that the questions have been deleted. Press the left arrow key to return to the Delete Questions screen.
4.5.4 Deleting a Section
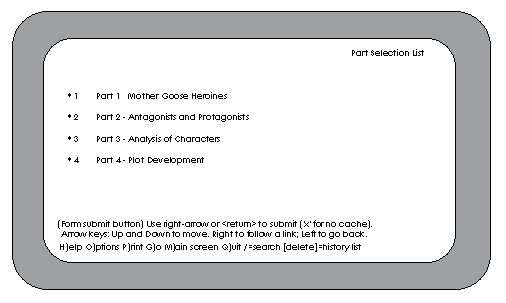
To delete an entire section of an exam, press the Delete button on the Modify Exam screen, this will take you to the Part Selection List screen. Select the section you wish to delete. You will be taken to the Confirm Delete Section screen as show below:
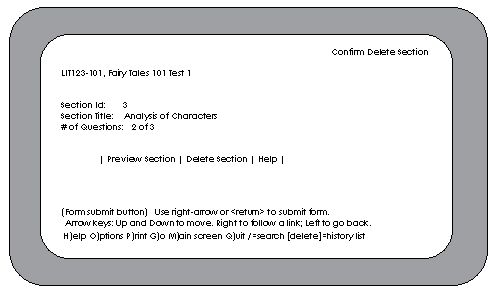
If you are certain the section displayed is the section you want to remove, press the Delete Section button; otherwise you may wish to preview the section to confirm that it is the one you wish to remove. When you do delete the section you will be notified that the section was deleted.
4.5.5 Rearranging the Sections of an Exam
To reorder the sections of an exam press the Rearrange button on the Modify Exam screen. You will be taken to the Rearrange Exam Sections screen which looks like this:
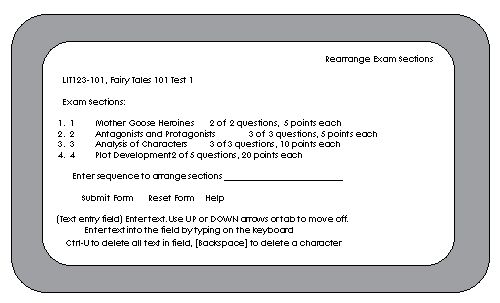
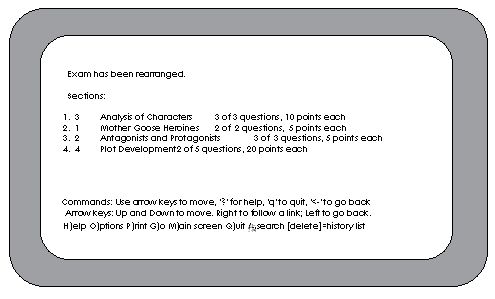
An overview of the exam is presented. The first column indicates the sequence number of the section (in other words, the order in which it appears). The second column of numbers indicates the section id the section was given when you created the section. The section title and listing of the number of questions and their point values also appears. Type the new order that you would like the sections to appear in the Enter sequence to arrange sections ___ field and then press the Submit Form button. For example, if you wanted section 3, Analysis of Characters to be the first section on the exam you would type 3,1,2,4. You will be notified that the exam has been rearranged, and the new sequence will be displayed as below:
4.6 Deleting an Exam
To delete an entire exam, press the Delete an Existing Exam button from the Exam Preparation Menu screen. The Exam Selection List screen will be presented, listing a header for each exam associated with the Make Exam activity you selected. Move to the button for the exam you wish to delete and press <ENTER>. You will be taken to the Confirm Delete Exam screen.
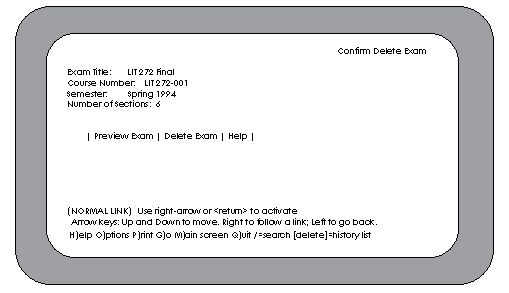
If you are certain the exam displayed is the one you want to remove, press the Delete Exam button; otherwise you may want to preview the exam to confirm that it is the one you wish remove. When you do delete the exam you will be notified that it was deleted.
4.7 Previewing an Exam
If you wish to see how an exam will appear when it is presented to a student, press the Preview Existing Exam button on the Exam Preparation Menu screen. EIES® will display a list of all the exam headers associated with the Make Exam activity you selected. Press the button for the exam you wish to preview. The exam will be displayed as below:
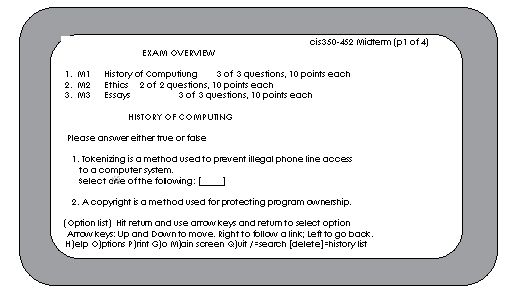
Use the TAB key to move through the exam. The student version of the exam is identical to what you will see when previewing, EXCEPT for any sections that were created using the random select feature. In a randomly selected section, ALL of the possible questions will be displayed when the creator of the exam is previewing. Only a subset of the question (the number of questions indicated by the exam creator) are used in the actual exam. The start of a random select section is denoted by "----- Beginning of Random Selection Group". Likewise, the end is marked with "----- End of Random Selection Group".
4.8 Scheduling an Exam
Once you have created an exam and wish to make it available for students to take, press the Schedule an Existing Exam button from the Exam Preparation Menu screen. Select the exam you wish to schedule from the Exam Selection List screen. EIES® will present an Exam Scheduling Information Form, such as the one shown below:
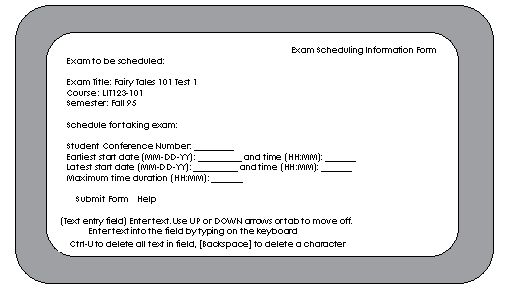
The exam header is listed in the top portion of the screen (to be sure you are scheduling the right exam). Enter the number of the conference where the exam is to be given in the Student Conference Number: field. In the Earliest start date (MM-DD-YY): enter the date students can begin taking the exam (for example, if you want your students to be allowed to take the exam starting January 15, 1996, type 01-15-96 as the earliest start date). Enter the time you would like students to be allowed to begin taking the exam in the time (HH:MM): field. This field uses a 24 hour clock (military time). To begin the exam at 8:00 a.m. type 8:00, to begin the exam at 8:00 p.m. type 20:00. When presented to the student, the time will be converted to a 12 hour clock, displaying am and p.m. In the Latest start date (MM-DD-YY): and time (HH:MM): fields, enter the latest possible date and time a student can begin an exam, using the same format as described above for earliest start date and time. Finally, enter the maximum amount of time a student can use to take the exam in the Maximum time duration (HH:MM): field. For example, if you want to allow only one hour for the exam, type either 1:00 or 00:60. Press the submit form button when you are finished entering the information. You will be notified that Scheduling of the exam in the specified conference completed successfully.
Once the exam is scheduled it will appear as a new comment in the student conference that was selected. A Take Exam activity will be attached to the new comment, indicating that an exam has been scheduled. The text of the comment will include the start and end times for the exam and the maximum time allowed to complete the exam.
NOTE: Once an exam has been scheduled it cannot be modified, so be sure your exam is complete before you schedule it.
4.9 Moderator Functions
After an exam has been scheduled you will be able to perform a number of moderator functions. To access these functions go to the conference where the exam has been issued and select review activitY list. On the Activities Review screen your status will be Author for all exams you created. Select Do and type the number of exam you wish to monitor. You will be taken to the TakeExam Monitoring Menu which appears below:
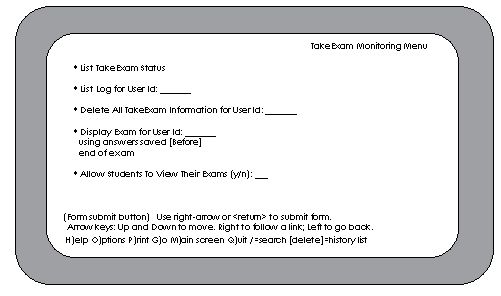
The List TakeExam Status button will present a list of all conference members and whether or not they have completed the exam. The List Log for User Id button will present the date and time an exam was created and issued for a specified user as well as the dates and times answers were saved, the end time of the exam, and the date and time any late answers were submitted. NOTE: Students may submit answers one time after the end time of the exam. You may view copies of the exam which were submitted before and after the end time. The Delete All TakeExam Information for User Id button will erase all exam information (including the students answers) for a designated user. This function would be used if a student were re-taking an exam. Use caution when using this function, as the students entire exam will be deleted. The Display Exam for User Id button will show you the completed exam for a specified student. You may view the answers that were submitted before or after the end time of the exam. The Allow Students To View Their Exams (y/n) button will permit (or disallow) a student to view the answers to their exam after the exam has been completed. The student will not be able to change their answers, only view them. This feature is not implemented yet. Currently, students are allowed to view their exams after taking them.